N4 Advanced Alarm Table


  • Shows Station Alarms
  • Updates in Real-Time
  • Acknowledges Alarms
  • Filter or View Historical Alarms
  • Play Custom Sounds
  • Silence Sounds
  • Multi-Language Support
  • Highlight on priority or state
  • BQL filtering options
  • Force user to write note
  • Full Alarm Record Detail Pop-Up
  • Modify Alarm Records
  • Hyperlinks
  • Alarm Ticker
Add to Cart
n4 charting

Overview


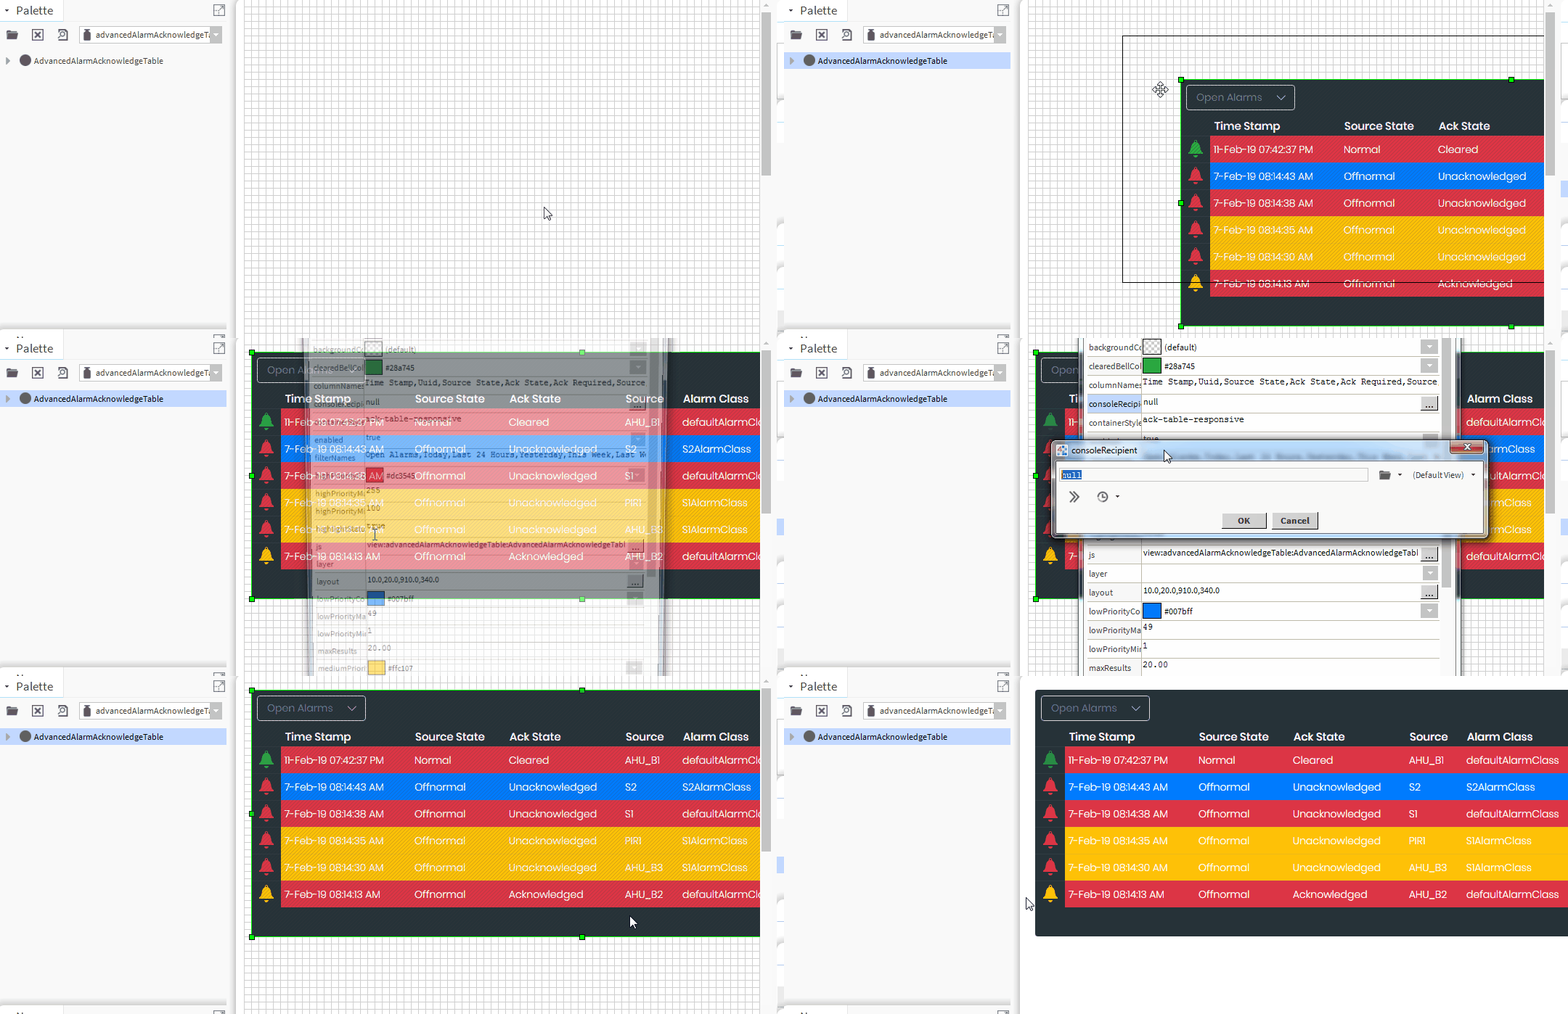
The Advanced Alarm Acknowledge Table shows the current and historical alarms in the station in a responsive table which updates in real-time. Unlike our other Alarm table, this widget highlights rows with 3 configurable priority levels. Additionally, historical alarms can be viewed by using the filter dropdown, which consists Open Alarms, Today, Last 24 Hours, Yesterday, This Week, Last Week, Last 7 Days, Month-To-Date, Last Month, Year-To-Date, and Last Year. You can also show the alarms in a ticker style.

The station operator can quickly acknowledge alarms in a user-friendly interface and use colors to distinguish priorities. Column names , filter drop down values, and the calendars can be changed to support multiple languages.

The widget has a number of configurable properties that can be used to modify look, feel, and functionality. Also check out the Alarm View Template.

Are you looking for a cost effective way to manage and visualize data for all your customers? Why not have a look at View Builder?

Usage


Before you start. Download the modules from our portal (see your order confirmation, which also explains licensing). Copy the modules file to your modules directory. Restart BOTH station and Workbench.

1. Copy the advancedAlarmAcknowledgeTable-ux.jar file to your modules directory.
    NOTE: The insightsDataProvider-rt.jar provides some of the advanced functions of the table like changing the priority.
2. Open the module from your palette file.
3. Drag and drop the widget from the palette onto your px view.

N4 Alarms


Properties


n4 alarms

The widget has a few configurable properties that can be used to modify look, feel, and functionality. Change the properties as required. All you need to do is set the console recipient property.

Console Recipient: you must set this to at least 1 console recipient in your station, otherwise you will not receive real-time alarms or be able to acknowledge alarms. Note: this setting is not related to which alarms show up in the table. Use the bql property to filter alarms in the table. E.g. alarmClass = 'defaultAlarmClass'

BQL:filters the alarms to show in the table. Not related to the console recipient setting above. E.g. alarmClass = 'defaultAlarmClass'

Overflow x and y: set this to visible or hidden to show/hide scrollbars.

Column Names: A comma delimited list of column names. Change to your preferred language. The number of values must remain the same.

Table Id: When you have more than 1 alarm table on your PX Page, set each alarm table to have a unique table name.

Table Date Format Examples:

  • dddd h:mmtt d MMM yyyy = Friday 9:49am 19 Jan 2018
  • M/d/y = 1/19/2018
  • HH:mm:ss = 09:49:29
  • hh:mm:ss TT = 09:49:39 AM
  • yy/M/d = 18/1/19
  • ddd MMM d \a\t h:mm TT = Fri Jan 19 at 9:49 AM


Language

Calendar Language:
 Language  Code
 Afrikaans  af
 Arabic  ar
 Algerian Arabic Translation  ar-DZ
 Azerbaijani  az
 Belarusian  be
 Bulgarian  bg
 Bosnian  bs
 Catalan  ca
 Czech  cs
 Cymraeg Welsh/UK  cy
 Danish  da
 German  de
 Greek  el
 English/Australia  au
 English  gb
 English - New Zealand  nz
 Esperanto  eo
 Spanish  es
 Estonian  et
 Karrikas  eu
 Persian (Farsi)  fa
 Finnish  fi
 Faroese  fo
 French  fr
 French - Canadian  fr-CA
 Hebrew  he
 Hindi  hi
 Croatian  hr
 Italian  it
 Japanese  ja
 Korean  ko
 Polish  pl
 Portuguese  pt
 Russian  ru
 Swedish  sv
 Chinese  zh-CN

Additional languages available upon request.


Alarm Ticker:

1. In normal mode, select the columns you want to appear for the ticker.
2. Then, change the show ticker property to true.

alarm ticker

alarm ticker


Using in your HTML Page


You can now use the widget in your custom html page as long as the html file is in a appropriate station directory. E.g.:
C:/../station/shared/demo1.html

1. Create an html page and place in your station files directory.
2. Create a div element and give it an id so you can inject the widget into this area. E.g.: widget1.
3. Add the following scripts before the closing head tag or the closing body tag. E.g.:

    
        <script type="text/javascript">

            var require = {
                paths: {
                    "nmodule": "/module",
                    "baja": "/module/bajaScript/rc/plugin/baja",
                    "bajaScript": "/module/bajaScript/rc",
                    "bajaux": "/module/bajaux/rc",
                    "lex": "/module/js/rc/lex/lexplugin",
                    "css": "/module/js/com/tridium/js/ext/require/css",

                    "jquery": "/module/js/rc/jquery/jquery-2.1.1",
                    "Handlebars": "/module/js/rc/handlebars/handlebars-v2.0.0", // For N4.4 or higher use /module/js/rc/jquery/jquery-3.2.0.min
                    "Promise": "/module/js/rc/bluebird/bluebird",

                    // these are runtime dependencies
                    "hbs": "/module/js/rc/require-handlebars-plugin/hbs",  // For N4.4 or higher use /module/js/rc/handlebars/handlebars.min-v4.0.6
                    "i18nprecompile": "/module/js/rc/require-handlebars-plugin/hbs/i18nprecompile",
                    "json2": "/module/js/rc/require-handlebars-plugin/hbs/json2",
                    "underscore": "/module/js/rc/underscore/underscore",
                },

                hbs: {
                    disableI18n: true
                }
            }
        </script>
        <script type="text/javascript" src="/module/js/com/tridium/js/ext/require/require.min.js"></script>
        <script>
            require(['/module/advancedAlarmAcknowledgeTable/rc/advancedAlarmAcknowledgeTableWidget.run.js'], function (app) {

                app.initialiseAdvancedAlarmAcknowledgeTable({
                    ackedBellColor: '#ffc107',
                    ackIconColor: '#1e88e5',
                    alarmText: 'Alarm(s)',
                    backgroundColor: '',
                    bql: "alarmClass = 'defaultAlarmClass'", // e.g. where alarmClass = 'defaultAlarmClass' (case sensitive)
                    clearedBellColor: '#28a745',
                    calendarLanguage: '', // default is English. See product sheet for options
                    dateFormat: 'mm/dd/yy',
                    dateWidth: '4.75em',
                    divId: '#widget',
                    consoleRecipient: 'station:|slot:/Services/AlarmService/ConsoleRecipient', // set this to any console recipient within the station
                    containerStyle: 'ack-table-responsive', // set this to '' to allow the table to inherit page styling
                    columnNames: 'Time Stamp,Uuid,Source State,Ack State,Ack Required,Source,Alarm Class,Priority,Normal Time,Ack Time,User,Message Text,Alarm Transition,Last Update,Instructions,Action',
                    enableSound: false,
                    filterNames: 'Open Alarms,Today,Last 24 Hours,Yesterday,This Week,Last Week,Last 7 Days,Month-To-Date,Last Month,Year-To-Date,Last Year',
                    fontColor: '#ffffff',
                    forceNoteOnAck: true,
                    overflowX: 'hidden', // set to visible or hidden show scroll bars
                    overflowY: 'hidden', // set to visible or hidden show scroll bars
                    highlightOnPriority: false, // row will be highlighted on priority
                    highlightOnAlarmState: true, // row will be highlighted on alarm state acked,unacked,cleared. Use the ackedBellColor, clearedBellColor, unAckedBellColor for colours
                    highPriorityColor: '#dc3545',
                    mediumPriorityColor: '#ffc107',
                    lowPriorityColor: '#007bff',
                    highPriorityMax: '255',
                    highPriorityMin: '100',
                    mediumPriorityMax: '99',
                    mediumPriorityMin: '50',
                    lowPriorityMax: '49',
                    lowPriorityMin: '1',
                    maxResults: 100,
                    showFilters: false, // shows state filters
                    showRefreshButton: true,
                    showTicker: false,
                    soundFile: 'module://advancedAlarmAcknowledgeTable/rc/sounds/smallBeep.wav',
                    soundRepeatInterval: '30', // In seconds
                    sourceText: 'Source(s)',
                    tableId: 'table1', // When you have more than 1 alarm table on your PX Page, set each alarm table to have a unique table name.
                    tableStyle: 'ack-table', // set this to '' to allow the table to inherit page styling
                    tableDateFormat: 'd-MMM-yy hh:mm:ss TT', // e.g. dddd h:mmtt d MMM yyyy, M/d/y, HH:mm:ss, hh:mm:ss TT, yy/M/d, ddd MMM d \a\t h:mm TT
                    tickerLogoFile: '/ord/file:%5Elogo-white-rect-70.png',  // file in stations shared directory e.g. /ord/file:%5Evb-logo-sm.png
                    tickerSpeed: 200, // smaller the number the faster
                    tickerLogoColor: '#808080',     
                    toText: 'to',
                    unAckedBellColor: '#dc3545',
                });
            });
        </script>

        </head>
        <!--html to go here-->
        <div id="widget1" style="width:300px;height:300px;"></div>
        <!--Rest of your html below...-->
                                    

You May Also Like


N4 Alarms to Line Messenger

alarm messenger

N4 View Builder™©

tridium bms system

Niagara Alarm View Template


back to more widgets...